多人共用GPU服务器集群LXD安装
2022/10/22大约 6 分钟
宿主机
系统
建议安装server版,通过ssh远程使用
环境
安装NVIDIA显卡驱动、CUDA、cudnn 参考:ubuntu安装cuda及cudnn
LXD的安装与初始化
准备工作
修改时区
sudo dpkg-reconfigure tzdata安装显卡驱动
sudo apt install gcc make -y禁用核显(如果有的话)
sudo nano /etc/modprobe.d/blacklist-nouveau.confblacklist nouveau options nouveau modeset=0sudo update-initramfs -usudo reboot
安装LXD
sudo snap refresh lxd --channel 5.0/stable强烈建议指定某个经过验证的稳定版本安装,防止有bug影响实际业务
禁用LXD自动更新
sudo snap refresh --hold lxd
sudo snap refresh --hold
一定要禁用自动更新,否则某个新版本可能会出现与当前版本设置有冲突的情况,导致所有账户无法访问。(若新版本有需要的功能,自行手动选择是否更新)
换国内源
sudo cp /etc/apt/sources.list /etc/apt/sources.list.backup && sudo nano /etc/apt/sources.list# 默认注释了源码镜像以提高 apt update 速度,如有需要可自行取消注释
deb https://mirrors.tuna.tsinghua.edu.cn/ubuntu/ jammy main restricted universe multiverse
# deb-src https://mirrors.tuna.tsinghua.edu.cn/ubuntu/ jammy main restricted universe multiverse
deb https://mirrors.tuna.tsinghua.edu.cn/ubuntu/ jammy-updates main restricted universe multiverse
# deb-src https://mirrors.tuna.tsinghua.edu.cn/ubuntu/ jammy-updates main restricted universe multiverse
deb https://mirrors.tuna.tsinghua.edu.cn/ubuntu/ jammy-backports main restricted universe multiverse
# deb-src https://mirrors.tuna.tsinghua.edu.cn/ubuntu/ jammy-backports main restricted universe multiverse
deb https://mirrors.tuna.tsinghua.edu.cn/ubuntu/ jammy-security main restricted universe multiverse
# deb-src https://mirrors.tuna.tsinghua.edu.cn/ubuntu/ jammy-security main restricted universe multiverse
# 预发布软件源,不建议启用
# deb https://mirrors.tuna.tsinghua.edu.cn/ubuntu/ jammy-proposed main restricted universe multiverse
# deb-src https://mirrors.tuna.tsinghua.edu.cn/ubuntu/ jammy-proposed main restricted universe multiverse
deb http://mirrors.aliyun.com/ubuntu/ jammy main restricted universe multiverse
deb-src http://mirrors.aliyun.com/ubuntu/ jammy main restricted universe multiverse
deb http://mirrors.aliyun.com/ubuntu/ jammy-security main restricted universe multiverse
deb-src http://mirrors.aliyun.com/ubuntu/ jammy-security main restricted universe multiverse
deb http://mirrors.aliyun.com/ubuntu/ jammy-updates main restricted universe multiverse
deb-src http://mirrors.aliyun.com/ubuntu/ jammy-updates main restricted universe multiverse
deb http://mirrors.aliyun.com/ubuntu/ jammy-proposed main restricted universe multiverse
deb-src http://mirrors.aliyun.com/ubuntu/ jammy-proposed main restricted universe multiverse
deb http://mirrors.aliyun.com/ubuntu/ jammy-backports main restricted universe multiverse
deb-src http://mirrors.aliyun.com/ubuntu/ jammy-backports main restricted universe multiverse
deb https://mirrors.ustc.edu.cn/ubuntu/ jammy main restricted universe multiverse
deb-src https://mirrors.ustc.edu.cn/ubuntu/ jammy main restricted universe multiverse
deb https://mirrors.ustc.edu.cn/ubuntu/ jammy-updates main restricted universe multiverse
deb-src https://mirrors.ustc.edu.cn/ubuntu/ jammy-updates main restricted universe multiverse
deb https://mirrors.ustc.edu.cn/ubuntu/ jammy-backports main restricted universe multiverse
deb-src https://mirrors.ustc.edu.cn/ubuntu/ jammy-backports main restricted universe multiverse
deb https://mirrors.ustc.edu.cn/ubuntu/ jammy-security main restricted universe multiverse
deb-src https://mirrors.ustc.edu.cn/ubuntu/ jammy-security main restricted universe multiverse
deb https://mirrors.ustc.edu.cn/ubuntu/ jammy-proposed main restricted universe multiverse
deb-src https://mirrors.ustc.edu.cn/ubuntu/ jammy-proposed main restricted universe multiversesudo apt update挂在开机自动执行脚本
sudo nano /etc/systemd/system/autostart.service[Unit]
Description=Auto Start
After=network.target
[Service]
User=root
ExecStartPre=/bin/sleep 10
ExecStart=/bin/bash -c 'auto_boot.sh'
Restart=on-failure
RestartSec=300
[Install]
WantedBy=default.target主要执行内容是开机自动打显卡驱动,脚本参考内容(auto_boot.sh):
#!/bin/bash

current_time=$(date +"%Y-%m-%d %H:%M:%S")
echo "Current Time: $current_time"

sudo bash /mnt/nas/sever_shared/shared/NVIDIA-Linux-x86_64.run --silent

sudo -S /sbin/modprobe nvidia-uvm
D=`grep nvidia-uvm /proc/devices | awk '{print $1}'`
sudo -S mknod -m 666 /dev/nvidia-uvm c $D 0

nvidia-smi

lxc start --all --stateless

sudo systemctl enable autostart.service
sudo systemctl enable autostart.service划分磁盘
查看可用磁盘和分区
sudo fdisk -l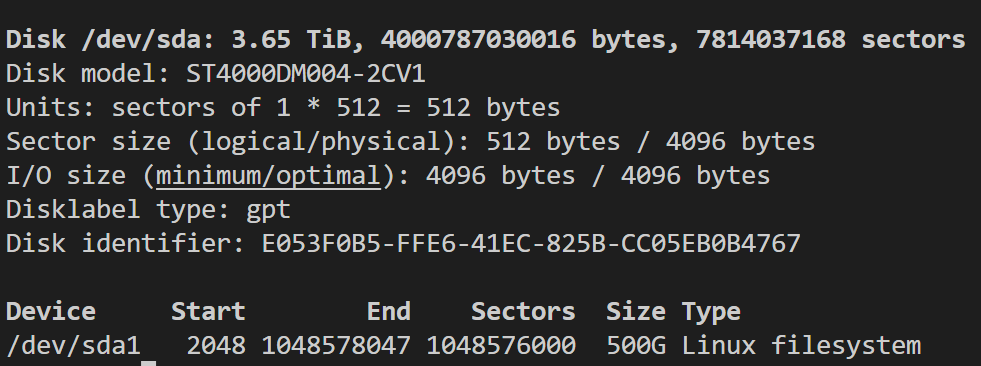
https://cdn.jsdelivr.net/gh/Ghlerrix/ImageHosting/img/image-20221021190819273.png 可以看到这块磁盘一共3.65T,只使用了500G,剩余的空间专门留出来用于LXD容器的。
查看分区
sudo gdisk /dev/sdX输入
n:创建新分区输入
w:写入分区表
LXD主节点初始化
lxd initWould you like to use LXD clustering? (yes/no) [default=no]: yes
What IP address or DNS name should be used to reach this server? [default=192.168.5.13]:
Are you joining an existing cluster? (yes/no) [default=no]:
What member name should be used to identify this server in the cluster? [default=s3]:
Setup password authentication on the cluster? (yes/no) [default=no]:
Do you want to configure a new local storage pool? (yes/no) [default=yes]: yes
Name of the storage backend to use (dir, lvm, zfs, btrfs) [default=zfs]: zfs
Create a new ZFS pool? (yes/no) [default=yes]:
Would you like to use an existing empty block device (e.g. a disk or partition)? (yes/no) [default=no]: yes
Path to the existing block device: /dev/sda1
Do you want to configure a new remote storage pool? (yes/no) [default=no]:
Would you like to connect to a MAAS server? (yes/no) [default=no]:
Would you like to configure LXD to use an existing bridge or host interface? (yes/no) [default=no]:
Would you like to create a new Fan overlay network? (yes/no) [default=yes]:
What subnet should be used as the Fan underlay? [default=auto]:
Would you like stale cached images to be updated automatically? (yes/no) [default=yes]: no
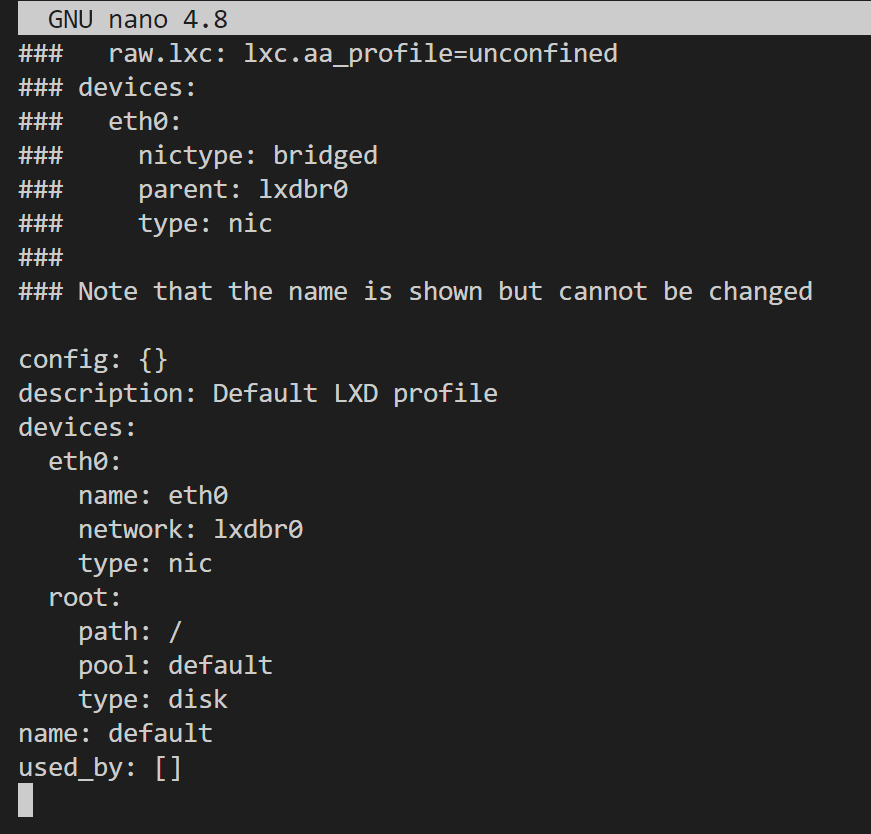
Would you like a YAML "lxd init" preseed to be printed? (yes/no) [default=no]:这里面的配置错了也没关系,还可以使用 sudo lxc profile edit default 再次修改配置
其余节点初始化(无其余节点,可忽略)
Would you like to use LXD clustering? (yes/no) [default=no]: yes
What IP address or DNS name should be used to reach this server? [default=192.168.5.14]:
Are you joining an existing cluster? (yes/no) [default=no]: yes
Do you have a join token? (yes/no/[token]) [default=no]: eyJzZXJ2ZXJfbmFtZSI6InM0IiwiZmluZ2VycHJpbnQiOiI3ZTFmNTU4MGRlOGI1NzYyOWNjMDY4ZDg2ZTE0N2UxNmY1NzljZmFiMDllYWQwNjBmNDM0NzEzNDA1NDkzYzBhIiwiYWRkcmVzc2VzIjpbIjE5Mi4xNjguNS4xMzo4NDQzIl0sInNlY3JldCI6ImEzNTVjMTVlOWNjYjU2NTUxM2NmMmY1NGY3ZDI2ZWE3M2Q3NGNiZTBlNGFhZmQ4NDE2MDdjZDk3OTMyYTcxZmIiLCJleHBpcmVzX2F0IjoiMjAyNC0wNy0yMVQxNjowODozNC4yNjQzNTQ2MDgrMDg6MDAifQ==
All existing data is lost when joining a cluster, continue? (yes/no) [default=no] yes
Choose "source" property for storage pool "local": /dev/sda1
Choose "zfs.pool_name" property for storage pool "local":
Would you like a YAML "lxd init" preseed to be printed? (yes/no) [default=no]:
容器的创建与连接
创建容器
sudo lxc launch ubuntu:20.04 template进入容器
sudo lxc exec template bash这里进入的是root用户,实际上容器里面还有一个用户名为 ubuntu 的默认用户
修改密码
passwd root
passwd ubuntu
设置SSH
编辑 /etc/ssh/sshd_config 文件,将 PasswordAuthentication 改为yes
sudo nano /etc/ssh/sshd_config
# 重启ssh服务
sudo /etc/init.d/ssh restart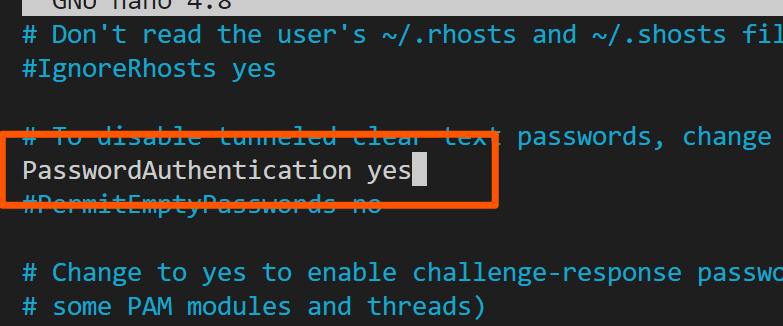
退出容器
exit查看容器IP
sudo lxc list端口转发
sudo lxc config device add lgh proxy0 proxy listen=tcp:{宿主机IP}:6002 connect=tcp:10.228.141.116:22 bind=host这里将宿主机的6002端口映射到了容器的22端口,ssh连接宿主机的6002端口即可进入容器
初始容器的配置
连接容器
ssh ubuntu@{宿主机IP} -p 6002添加显卡
添加所有显卡
lxc config device add {容器名} gpu gpu gputype=physical添加指定显卡
lxc config device add {容器名} gpu0 gpu gputype=physical pci:{显卡的地址}显卡地址可以通过命令 lxc info --resources 查看
安装显卡驱动
与宿主机的显卡版本必须一致,需要注意的是容器里面安装显卡驱动时需要加上后面的参数,安装时不需要安装到内核
sudo sh ./NVIDIA-Linux-X86_64-[YOURVERSION].run --no-kernel-module容器模板
可以将配置好的容器打包成镜像模板,方便后续的容器创建
停止容器
lxc stop {容器名}打包
sudo lxc publish {容器名} --alias {镜像名} --public
共享目录
lxc profile device add default data disk source=/data/lxd-data path=/opt/data readonly="true"例如:可以共享CUDA目录
lxc profile device add default CUDA118 disk source=/usr/local/cuda-11.7 path=/usr/local/cuda-11.7 readonly="true"- 宿主机的英伟达驱动重启了后宿主机不使用,容器内是不能用的,解决方法如下
参考文章
shenuiuin/LXD_GPU_SERVER: 实验室GPU服务器的LXD虚拟化 (github.com)